Self-Hosting a Browser-Accessible Kali Box with KasmVNC and Cloudflare
Contents
What did I build and Why
I was doing some tryhackme.com boxes last week (After a long time away from CTFs), and as I was using their “Attackbox” (A broswer-based, NoVNC Kali Linux machine hosted in their infrastructure), I remembered I’ve had this idea of “Why don’t I host one myself?” since 2020.
So I took a quick detour from the CTF I was doing, to start this mini project, to host my own custom Kali Machine, accessible through my browser. Anywhere, anytime. Just there. I don’t need to be in my homelab, spin up a VM in my laptop/PC, nothing.
A few risks involved in that. So tackling them was the first part of the puzzle of building this.
Locking it down.. but not too much
I want to reach this Kali Linux desktop from anywhere, so that means exposing it to the internet. BUT not to “anyone”, AND it’s a box I treat as potentially hostile, so that means I also need to lock it down.
Reachability limitation: This Kali box can reach out (internet + tun0 VPN), because it’s designed for CTF purposes. So nothing on the public internet can initiate a connection back to it. It’s behind NAT with no inbound forward, and the only public surface is the Cloudflare-fronted desktop. For CTFs there’s no issue: targets live inside the VPN, there are no colliding IPs (See Proxmox Firewall rules below) and callbacks return over tun0. If you ever needed a public inbound endpoint for Bug Bounty/Red Teaming purposes (webhook, OAuth callbacks, sharing a local app…), there are alternatives for quick, throwaway exposure (Ngrok, Cloudflare itself..)
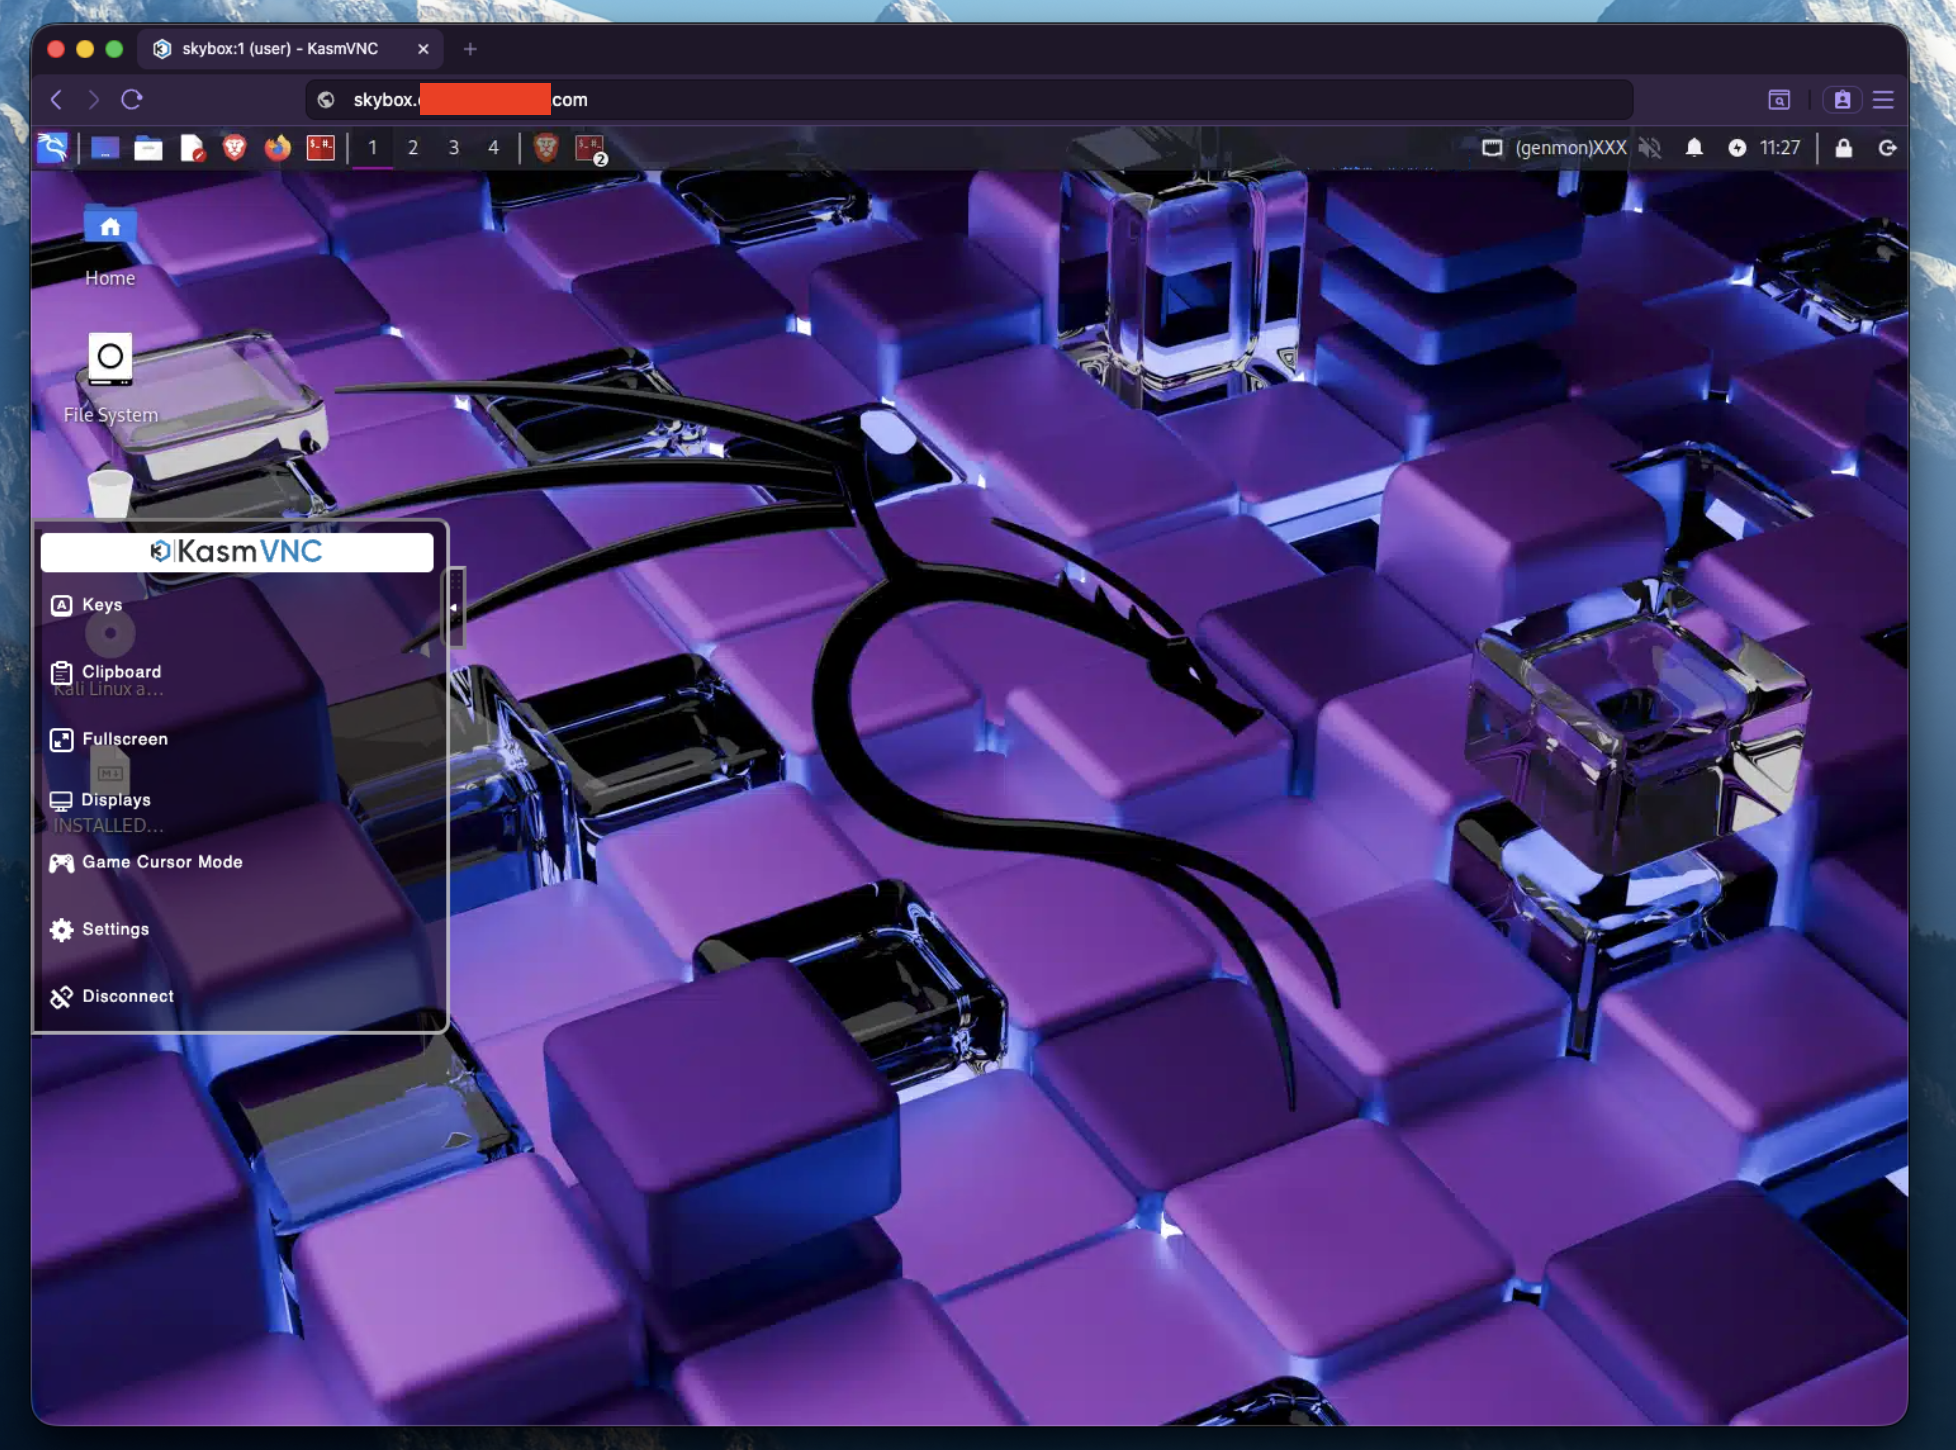
The final product:
Isolation 1: Proxmox firewall: LAN isolation
This part deals with Proxmox host isolation. If you don’t care about Proxmox, you can skip this part.
Before any Proxmox Firewall rule is set:
- Datacenter → Firewall → Options → Firewall:
Yes - VM → Firewall → Options → Firewall:
Yes - VM → Hardware → netX → Firewall: checked
/etc/pve/firewall/109.fw (109 is the number of the VM in Proxmox):
[IPSET lan_net]
10.0.0.0/8
172.16.0.0/12
192.168.0.0/16
169.254.0.0/16

[OPTIONS]
enable: 1
policy_in: ACCEPT      # Not isolating the host at inbound
policy_out: ACCEPT     # Outbound access by default

[RULES]
# Exception: DROP to "lan_net"
OUT DROP -dest +lan_net
i.e. “Deny access to any private network”. This would create issues if we connected this host to another network via VPN, but that’s not something I plan on doing with this specific Kali LInux (Neither tryhackme or Hackthebox use those addresses).
This of course, doesn’t deny access TO this machine. The threat model here doesn’t include “another machine in the LAN potentially being hostile to my Kali LInux machine”
Apply & Verify:
pve-firewall compile
pve-firewall restart
pve-firewall status
When it’s live, the compiled tapXXXi0-OUT chain contains:
-A tapXXXi0-OUT -m set --match-set PVEFW-109-lan_net-v4 dst -j DROP
Proxmox also throws in a free MAC anti-spoof rule and DHCP allowances. nice.
Disabling IPv6 persistently
Disabling IPv6 at the kernel level: adding:
ipv6.disable=1 to GRUB_CMDLINE_LINUX_DEFAULT in /etc/default/grub, then
sudo update-grub && reboot
Isolation 2: CLoudflared (Cloudflare tunnels)
This procedure seems to change quite often (I’ve done this at least 4 different ways throughout the years) so better to follow along with the official docs:
Self-signed cert (Kasm)
KasmVNC serves its desktop over an HTTPS endpoint secured with a self-signed certificate. Because cloudflared validates origin certificates by default, it rejected that self-signed cert and returned a 502 (Tunnel error). Enabling **No TLS Verify** on the tunnel’s public-hostname config tells cloudflared to skip origin certificate validation, so it connects to KasmVNC over the encrypted-but-untrusted link.
The Cloudflare application was a bit complicated to setup, due to recent UI changes in Cloudflare but after a bit of research (https://developers.cloudflare.com/tunnel/routing/ and https://developers.cloudflare.com/tunnel/advanced/origin-parameters/#notlsverify) I ended up where I needed:
- Under
Zero Trust>Tunnels & Mesh>My Kasm Tunnel>Published application routes>Edit, I setNoTLSverifyto “ON”
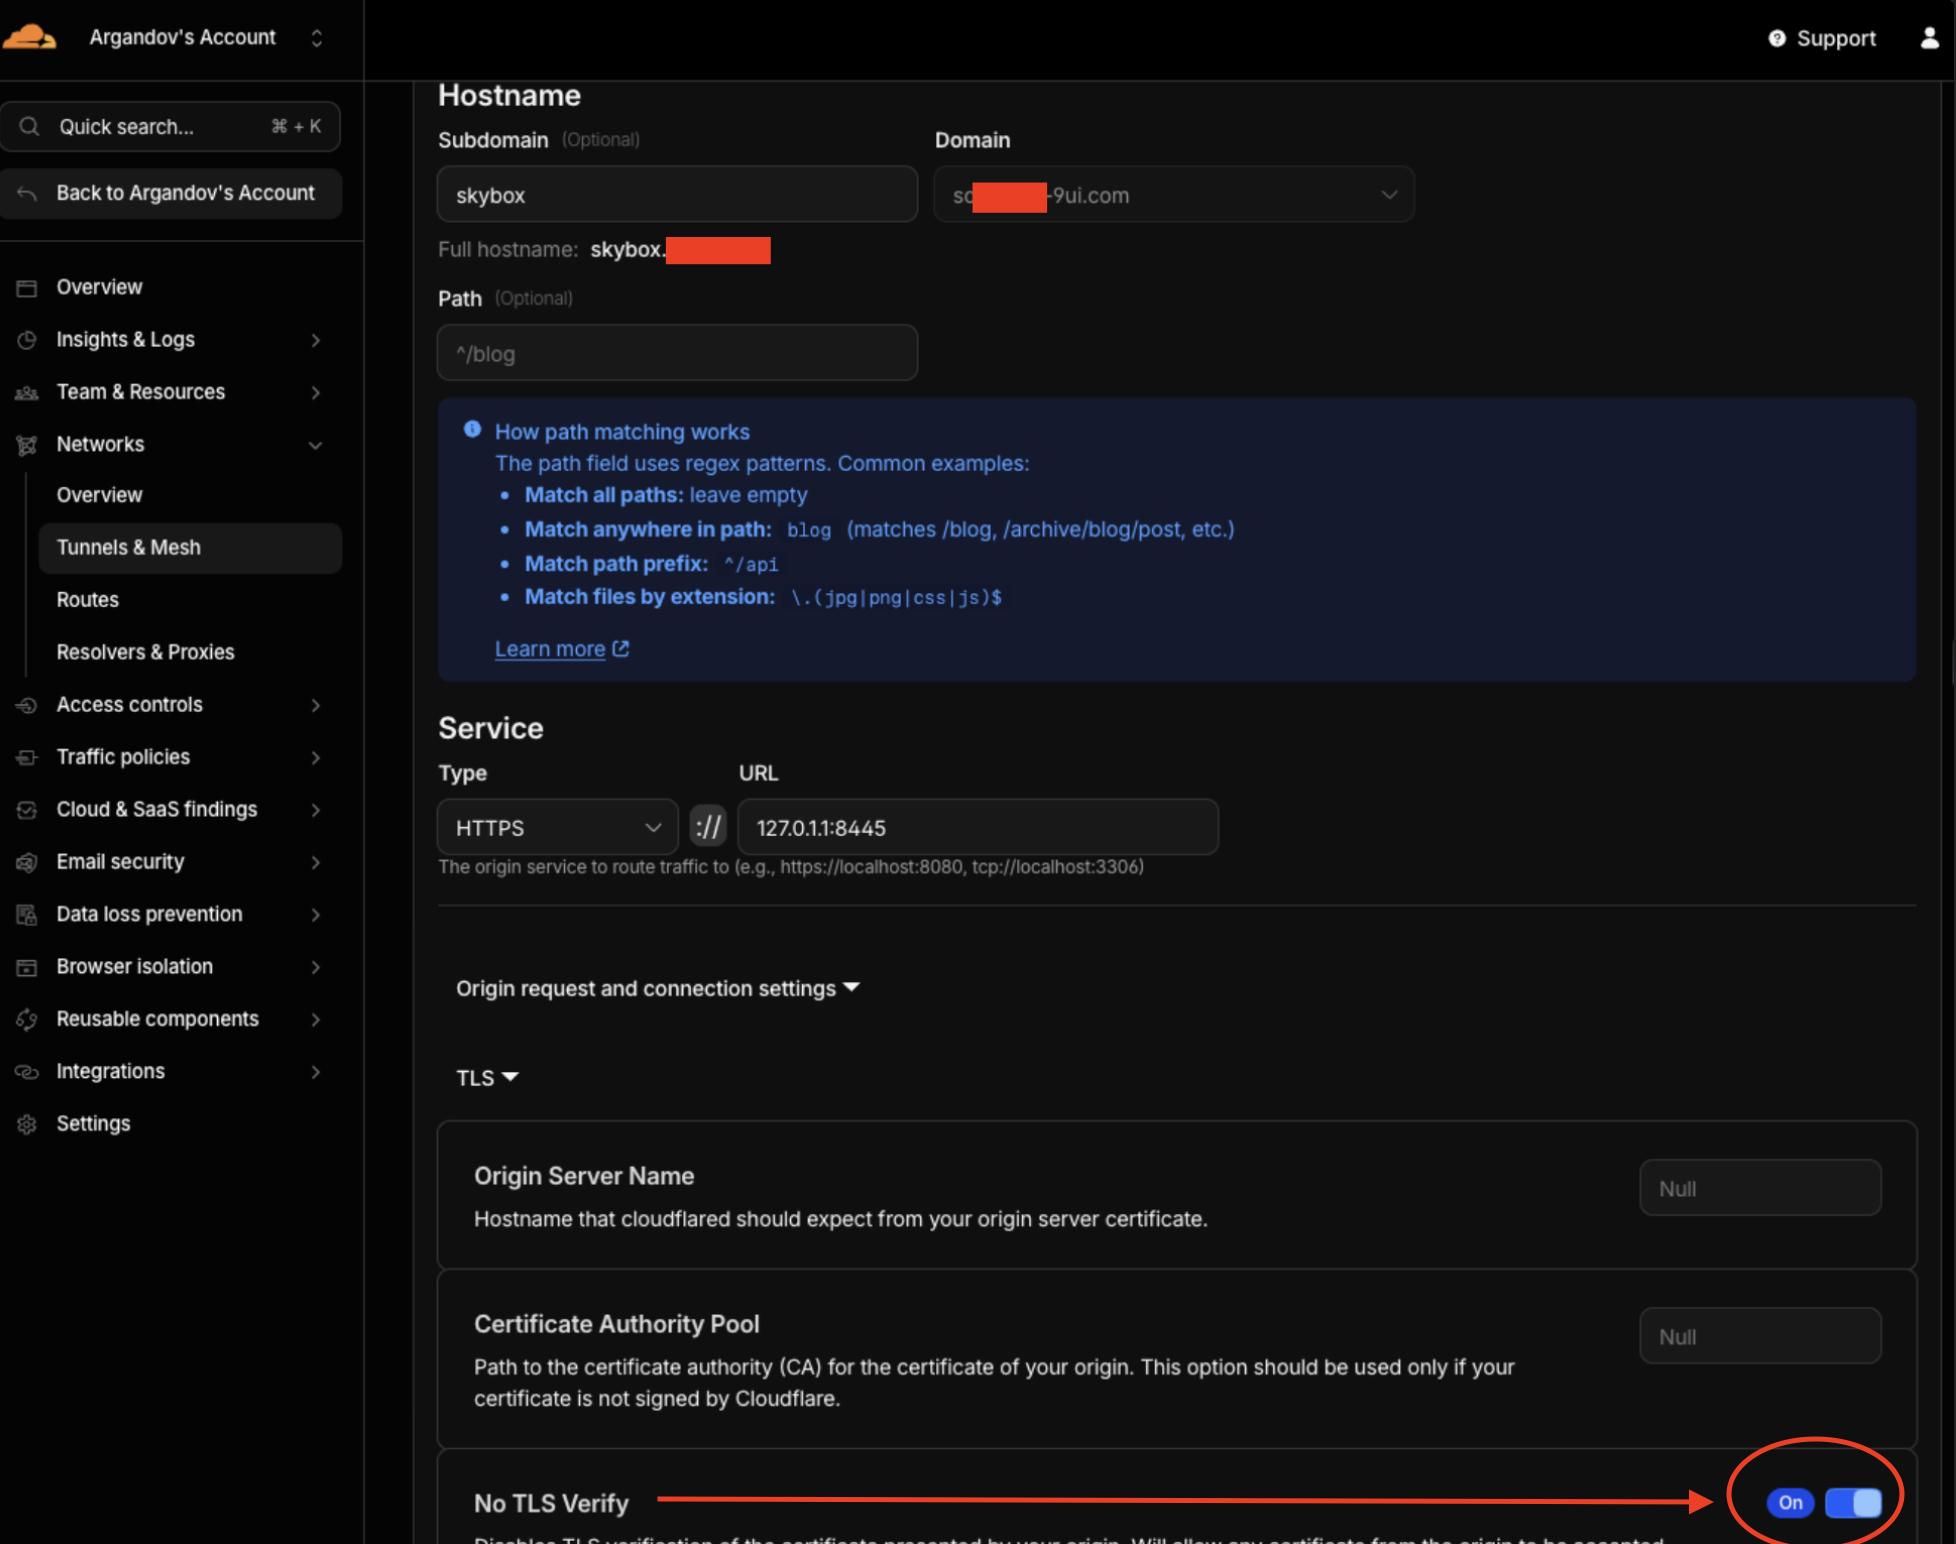
Cloudflare Application (Securing the tunnel)
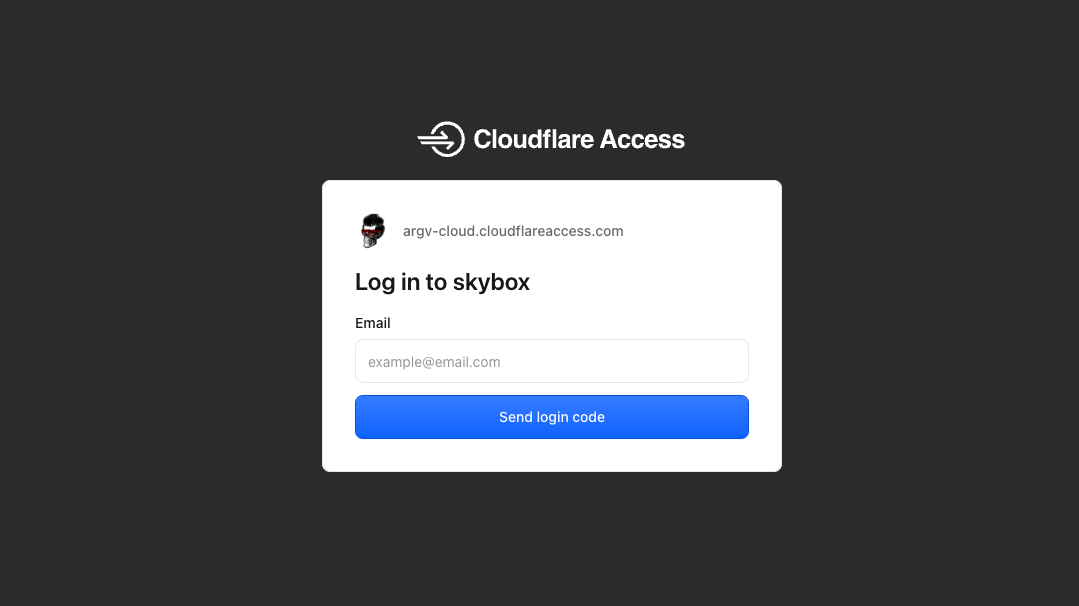
Once the Cloudflare tunnel is set to a subdomain, we need to set this tunnel to an “Application” (Where we set an access control to be able to visit the application).
Again, I got lost here due to recent UI changes in Cloudflare and took me a while to find what I needed, but it’s now under Cloudflare’s Zero Trust > Access Controls > Applications.
- Create new Application,
- “Self-hosted and private”, choose “Public DNS” (Because we just exposed the tunnel through a subdomain we own so there’s a Public DNS already)
- Add a proper policy (In this case I don’t use an IdP, I just use an OTP method, and the allowed “user” is an email I own).
Once set, we just visit our subdomain through the browser, and we should be “gated” with an Email input. That’s how we know it’s already locked down.
No need to try out the policy, since we’ll end up in a Tunnel error, since nothing’s listening on the port we chose for this tunnel.
VNC Exposure: Kasm VNC Install
From https://kasmweb.com/kasmvnc/docs/master/install.html
I installed KasmVNC user-wide, not system-wide.
mkdir -p ~/.vnc
Create ~/.vnc/xstartup and add:
#!/bin/sh
export XDG_SESSION_TYPE=x11
dbus-launch --exit-with-session startxfce4
chmod +x ~/.vnc/xstartup
The self-signed cert headache
Do I even need TLS on a localhost hop (between cloudflared and KasmVNC), since I’ll never use VNC to access this box remotely? Well, no.
But KasmVNC is HTTPS-first and doesn’t cleanly serve plaintext on most builds, so the self-signed cert + Cloudflare’s No-TLS-Verify ends up being a well-documented path. A little bit of overkill, but worth it. I didn’t find a way to serve KasmVNC in plaintext anyways.
vncserver :1 refused to start, failing on the system “snakeoil” TLS cert:
/etc/ssl/private/ssl-cert-snakeoil.key: certificate file doesn't exist or isn't a file
KasmVNC serves HTTPS and, by default, reaches for the system snakeoil cert, which on this box had broken ownership/permissions. Regenerating it didn’t help, because the default config didn’t explicitly point anywhere and kept falling back to the unreadable path. The fix that worked: give KasmVNC a self-signed cert I own, and point its config straight at it. Since cloudflared connects with No TLS Verify anyway (see above), the cert only needs to exist and handshake. it doesn’t need to be trusted.
Generate a self-owned cert (key + cert in one PEM):
openssl req -x509 -nodes -newkey rsa:2048 \ -keyout ~/.vnc/self.pem -out ~/.vnc/self.pem \ -days 3650 -subj "/CN=skybox" chmod 600 ~/.vnc/self.pem
Then point KasmVNC at it in ~/.vnc/kasmvnc.yaml (YAML is whitespace-sensitive: indentation of 2 spaces, no tabs):
logging:
  log_writer_name: all
  log_dest: logfile
  level: 100
network:
  ssl:
    require_ssl: true
    pem_certificate: {$HOME}/.vnc/self.pem # CHANGE THIS <--
    pem_key: {$HOME}/.vnc/self.pem # CHANGE THIS <--
Kill the current session (If any):
vncserver -kill :1 2>/dev/null
No special reason, but I chose Kasm to run on port 8445:
vncserver :1 -websocketPort 8445
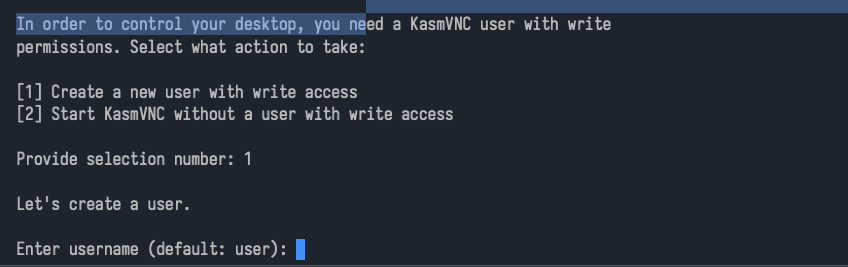 After user creation, choose (2); XFCE. Apparently it’s lighter than GNOME on a headless VNC Session.
Kasm Persistence
Creating a user-scoped systemd unit:
mkdir -p ~/.config/systemd/user
Creating the unit, user-scoped (~/.config/systemd/user/kasmvnc.service):
[Unit]
Description=KasmVNC server on :1
After=network-online.target
Wants=network-online.target

[Service]
Type=forking
# clean up any stale session/lock before starting
ExecStartPre=-/usr/bin/vncserver -kill :1
ExecStartPre=-/bin/rm -f /tmp/.X1-lock /tmp/.X11-unix/X1
ExecStart=/usr/bin/vncserver :1 -websocketPort 8445
ExecStop=/usr/bin/vncserver -kill :1
Restart=on-failure
RestartSec=5

[Install]
WantedBy=default.target
sudo loginctl enable-linger "$USER"
I don’t really know much about X11, so this part was HEAVILY supported by Claude.
Enable it + check:
systemctl --user daemon-reload
systemctl --user enable --now kasmvnc.service
systemctl --user status kasmvnc.service
And it’s alive!!
Locked-down, easily accessible, self-hosted and custom AttackBox!
Conclusions and observations
The performance of the machine through Cloudflare tunnel + VNC turned out to be way better than expected. It’s snappy, haven’t found any bugs at all, and I can work on whatever I was doing before this. There’s no “Super” (Or “Cmd” on MacOS), or “Alt” (“Option”), since those are taken by the browser/host. I’m okay with it for now.
The real break-glass is the Proxmox console’s text TTY (Ctrl+Option+Fn+F3 in MacOS, or just Ctrl+Alt+F3 on PC, sent via the noVNC key-sender). it works if/when Cloudflare, the tunnel, and SSH are all down. A shell is enough to fix most outages; to free the graphical seat: systemctl --user stop kasmvnc if you specifically want the GUI on the console. (Or just log in as another user).